Hi again people!
I do love laptops. And wireless internet connections, WiFi! They're such a natural combination that it's hard to think of one without the other. When it comes to running Second Life though, Laptops do have a problem. The generic low priced Windows 7 laptops that have been generally available miss the mark by a wide margin on 3d graphics performance.
I had this brought home to me as my 'usual' laptop began to die and I had to shift to an emergency backup laptop. My 'usual' was a laptop with two processors, 2 gigabytes of memory, Windows 7 32bit, and a Nvidia Geforce G 105m Graphics chip. It's one of the versions of the Lenovo Thinkpad SL500. The emergency backup laptop was about one year newer, it has the two processors, 4 gigs of memory and Windows 7 64 bit and sadly, no graphics chip. My Second Life performance (Frames Per Second) was not stellar with my usual laptop, but it was mostly ok. Ok that's pretty subjective, I know. but honestly that's bottom line. And measured against that same bottom line, the emergency backup laptop was very much NOT ok. It sucked.
I have been watching the world of Intel and AMD with interest as they added graphics processing to their CPU offerings and so naturally started looking for more information on them as my usual laptop started circling the drain. Intel's Sandy Bridge series seemed to look right for me and I quickly focused on the i5 over the i3 due to its better graphics processor. Some benchmark comparisons found on the web put the i5's HD3000 on-chip graphics slightly above the level of nVidia's G 105m - so I visited the Lenovo website, found the Edge E420s, took a deep breath, and plunked my credit card down next to the keyboard of the emergency backup laptop and bought one.
I think that these new Intel an AMD offerings are especially important for Second Life. Before this, the run of the mill PC, one without a specialized graphics chip, was simply inadequate for a good Second Life experience. My suspicion was that with these new offerings, that was changing, and a laptop without a graphics chip could provide a decent Second Life experience.
And now, after a few days of experimentation with my new Sandy Bridge laptop, I can report that my suspicions were correct. While my new laptop will not win any FPS contest anytime soon, it does seem perfectly adequate for a large number of Second Life Sims. This is good news for Linden Labs. Soon Intel's and AMD's new cpus will be the dominant offerings in laptops from all manufacturers and LL will find that when someone gives SL a try on a whim their performance will be just fine in most of the Sims they visit.
However, there are a couple of flys in the ointment. Laptops like to be really really serious about conserving energy and its not unreasonable to have things like processor speed set to the most power-saving mode possible. Unfortunately, this will not provide a good Second Life Experience.
The second fly in the ointment is the newness of these processors and the likelihood that the user will need to update things like the device drivers, especially those for the the Graphics and Power related things like Intel's Turbo-Boost technology.
My experience with my new Sandy Bridge laptop can help illustrate these problems.
After I had unwrapped my new E420s, plugged it in and turned it on.... it wasn't very long before I had downloaded a new copy of the various viewers I am fond of and started trying them out with Second Life. I was very, very disappointed in the performance. The Frames Per Second I was achieving were much lower than what I had achieved with the old dying computer with the Nvidia chip. This was frustrating and puzzling since the comparisons I had found for the graphics hardware indicated that the HD 3000 was a bit better than the G 105m. Why was it performing so poorly?
After struggling with it for a while, I decided to see if Intel had a new graphics driver for the HD3000, the 3d graphics portion of the i5 chip. The date on my driver (found in the Device Manager) was 3/25/11, and the date on the new driver at the Intel website was 4/10/11, just about 2 weeks newer. Ii downloaded and installed it and quickly found that the performance had improved by 15% to 55% depending on graphics setting and Sim. This was certainly good news, but still the performance was much lower than I thought it would be.
As I continued setting up the computer, I visited the Power Manager Lenovo provides and looked at the Power Plans. I can't recall what it was originally set to, but I fiddled with it and changed some of the settings in ways I thought reasonable, including setting the CPU performance to be 'Adaptive'. Then I revisited SL and looked at the FPS again, they had surged dramatically! Where before, in a lightly loaded Sim, I was getting 14 frames per second, I was now getting over 50!
After rubbing my eyes and testing more carefully. I found that the thing I changed that had made a difference was the System Settings -> Maximum CPU Performance. If I set it to Lowest for good power savings, my performance was around 14 FPS and if I set it to Adaptive, it was over 50 FPS and the graphics preferences were set to Medium.
Now please don't get your hopes too high, 50 Frames Per Second is not mylaptop's normal performance in most Sims. This was a lightly loaded Sim with few avatars present and I was at an altitude with relatively few nearby objects. But after some Sim-hopping, I've concluded that something around 20 FPS is a pretty reasonable expectation on the medium graphics setting. It might be 14 or 15 or it might be 25. And there are also Sims where Intel's new on-chip graphics simply does not keep up... I found one Sim where I was at about 8 fps and moving was like walking in molasses. This one had almost 50 people in it and was gorgeous with many fine touches - but the cost was walking in molasses.
My conclusion is that the i5 with the HD3000 is a nice processor for a laptop and can run SL comfortably in most cases.
Your conclusion may differ, especially if you frequent one of those Sims that has a huge number of people and a complex set of objects, or if you're seriously into fighting with bows or guns and want to do so at one of the higher graphics settings. And there is no doubt that adding a graphics chip will make the performance even better.
But that's not the way the average new SL resident will show up, they'll show up with whatever laptop they're currently using. And in the future, more and more will be showing up with Intel's Sandy Bridge and AMD's equivalent..... and that's a good thing!
robin
Tuesday, May 31, 2011
Saturday, May 14, 2011
Making clothes - Tank top - Variations on a theme.
Once I make something I seem to always play around with it and create some things that are variations on the theme. So I thought I'd show everyone two of them.
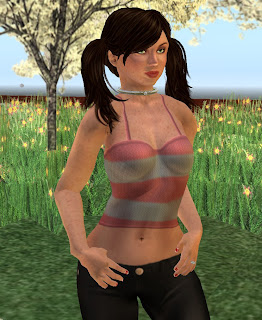 The first is is pretty simple, its the same cut and straps with broad stripes. I made them a kind of dark pink and grey. I used the same approach to creating the stripes as we used to create the trim and straps. But as you can see they're much broader. I added a texture to the fabric too - different that the previous. Its created by a simple X, with the position of the 'light' straight overhead. Click on it and you will see a larger version.
 The second is a nice light green bunneh top. *blushes* Ok, and perhaps a little on the semi-transparent side. For this one I made the bunneh in a 32x32 as a tile using the seamless tile technique I described earlier. Then used the Filters->Map->Tiles to make a fabric. Then applied it to first the front, positioning it to cover certain delicate areas as much as possible. Then after reducing the size of the fabric by 10%, applied it to the back.
With this lighter version I found I needed to do a several things special for it. I had to double the shadow layers we got from Eloh's skin file. When I did this I noted a tint, a kind of warm pink color creeping in. So I had to go through and desaturate all of the shadows. That took care of the pinkish tint. And I found that I had to increase the intensity of the shadows for the folds to show. I actually performed the 'bump map' operation on the fabric and the bunnehs a couple times to get a good effect.
robin
Thursday, May 12, 2011
Making clothes - A tank top, Final
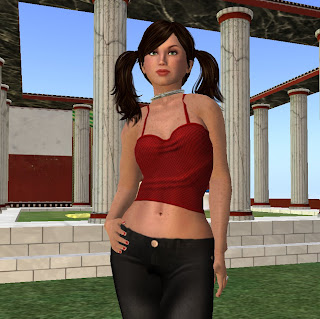
Oops! I forgot to show you what the top looks like when all is said and done! So here's a picture of me wearing it. I'll point out a few things just as review:
Well, other colors would be first on my list. The dark red is nice but you might like a dark blue or something similar. You'll probably find that if you stay to the dark colors you'll need to make fewer changes to the highlights and shadows. The question is how to do this and preserve the texture we've added to the top fabric with the Bump Map filter? The answer is to use Colors->Map->Rotate Colors. Make the "From" range encompass the reds and the "To" range encompass the blues of whatever target color you wish.
Another path for future work would be to replace the main red fabric of the top with something that has a nice printed pattern. To do this, go back and look at the posts in this blog that tell you how to make a seamless tile ( http://robin-makingstuff.blogspot.com/2011_03_01_archive.html ). Then use that tile to make your fabric, change the color of the trim and straps to match and add back in the wrinkles, and you'll have another nice top.
And one more path to think about.... change the straps to create a halter top rather than a tank top. To do this you would move the tops of the front straps a little closer together at the top and then connect them with a strap on the lower part of your neck. (deleteing the other straps doing down the back of course).
Well, I hope that gives you some ideas.
robin

- The fabric of the top has a nice texture, actually two different kinds, the randomized color and the stippling.
- The trim adds a nice finishing touch to the top and to give it a little 3d look adds to it as well.
- Using Eloh Eliot's Starlight skin file as a starting point allowed us to use her shadowing and highlighting on the top - a very big step forward in making it look good.
Well, other colors would be first on my list. The dark red is nice but you might like a dark blue or something similar. You'll probably find that if you stay to the dark colors you'll need to make fewer changes to the highlights and shadows. The question is how to do this and preserve the texture we've added to the top fabric with the Bump Map filter? The answer is to use Colors->Map->Rotate Colors. Make the "From" range encompass the reds and the "To" range encompass the blues of whatever target color you wish.
Another path for future work would be to replace the main red fabric of the top with something that has a nice printed pattern. To do this, go back and look at the posts in this blog that tell you how to make a seamless tile ( http://robin-makingstuff.blogspot.com/2011_03_01_archive.html ). Then use that tile to make your fabric, change the color of the trim and straps to match and add back in the wrinkles, and you'll have another nice top.
And one more path to think about.... change the straps to create a halter top rather than a tank top. To do this you would move the tops of the front straps a little closer together at the top and then connect them with a strap on the lower part of your neck. (deleteing the other straps doing down the back of course).
Well, I hope that gives you some ideas.
robin
Wednesday, May 11, 2011
Making clothes - A tank top, part 3
Now its time to spiff up the tank top we've been working on. We need to take it out of the freebie realm and into something that we would be proud to wear. As I mentioned in the last post there are several steps we will go though to do this:
- Straps and Trim: Give them some shadowing, a small 3d effect.
- Fabric:
- Randomize the color
- Add some stippling, a small 3d effect.
- Add wrinkles to the fabric in appropriate places
- Add a hint of nipples (blush!)
- Fabric, Straps and Trim together: Use the layers in Eloh Eliot's starlight upper skin file that we started with to add shadows and highlights
Randomize the color.
This is very simple to do. Make the fabric layer active in the Layers window and in the image window choose Filters->Noise->HSV Noise.
The values you put in the dialog window are totally up to you. I like to add very little Hue noise (changes in color), a little more Saturation noise (a range from dark red to pink to white) and much more Value noise (a range from dark red to darker red to black ). Use the crossed arrows to move the window so you can see the preview and then play with the choices and see what you like.
If you'd like you can apply these changes to the straps and trim too. Or make the randomization different. Its up to you.
Here we will use the Bump Map filter to add the appearance of shadows and highlights to the straps and trim. Its not really very difficult once you have the hang of it. There are two steps, broadly speaking. First create the 'bump mask'. And second use the Bump Map filter to apply that bump mask to the fabric. The application actually changes the fabric layer, so its a good idea to make a copy and make your changes there.
 Let's step through it, first making the bump mask...

Repeat the above with each of the fabric layers (straps, trim) that you have and the appropriate bump mask layer for each. And you should end up with something that looks like the picture below.

Now with the straps and trim having some 'interest' too the top looks even better.
Add stippling to the fabric to give it a 3d look
This will be very similar to what we did above for the straps and trim. But we will create the bump mask for our fabric in a different way. We will create a simple seamless tile and use that as our bump mask, applying it to the fabric from a separate GIMP image in a tiled way. That sounds complicated but it isn't really.
Let's make the tile:

We need to make this into one layer to make it a bump mask for the fabric, so go to Image->Merge Visible Layers and choose Merge.
Now we're ready to use this as a tile on our fabric. Make the original Image window active and go to the Layers window and make sure the fabric layer is selected. Then choose Filters->Map->Bump Map and in the bump mask selection pull down, find the layer we just created in the Bump Mask file. As before you might want to have given it a name to make it easier to find in the list. Then move the image preview window to and make adjustments to the values. I found that one that is good to change in this case is the Azimuth. The Azimuth is the angle at which the imagined 'light' is striking your bump mask to create highlights and shadows - move it around and find an angle that gives you a result that you like. You can see my results in the image below.

Add Wrinkles
We'll be using the Bump Map filter again to add wrinkles. I would bet that by this time you will have guessed the procedure, and you would be right. We're going to create a bump mask layer and then apply it to the fabric using the Bump Map filter.
*takes a deep breath* ...... However! ......*pauses*
Making the bump mask for wrinkles is pretty tricky. I'll tell you right now, be prepared to make about 10 or so before you finally have something you like. So you will want to plan accordingly and make copies of the layers you'll be applying your changes to - so you can back up as needed.
The problem is that the wrinkle is largely free-form and will require a steady hand. If you're on a laptop and have a mouse pad of some sort, you're in luck. That has been the best way of making wrinkles that I have been able to discover. My approach usually uses a combination of mouse pad and mouse. It can be done with just your mouse, or just a mouse pad, but it will be more difficult.
I'm going to just sketch out how to do it in words here and show you how it should look when you're done and then leave you to your own devices. If you decide this is just too much for now, I do understand. But.... Wrinkles really add a lot to the realism of the top, so if you can figure it out you will be very pleased with the results.
First - think of one wrinkle at a time, not wrinkles as a group. Each wrinkle, as we create it, will be in a separate layer. When we're happy with all the wrinkles we can combine them into one layer for use as a bump mask.
So here's how I create a wrinkle. We will create one between the breasts on our top as a starting point.
Then apply your bump mask to the fabric with your bump map filter and you'll see something like this as an end result.
Whew! That was difficult! But fortunately the last is not.....
Adding Nipples
 This is really pretty simple and I would guess that by now you could figure it out yourself. I just tell you how to do it and show you the result.
We'll create a transparent layer to hold our bump mask (appropriately named for this step *grins* ). Then we'll make sure our template is visible and make the fabric a little transparent. Select the paint brush and choose a fuzzy circle, you'll have to experiment to get the size you want. Then center the mouse pointer on the nipple portion of each breast and click. That's your bump mask.
By now you're an expert in using the bump map filter so go ahead and use your bump mask and apply it to the fabric. At the end you should see something like the image on the right.
OK! We're done! How do you like it?
robin
Add shadows and Highlighting al la Eloh Eliot
As I mentioned, it's really not complicated at all. We turned off all the layers in this file earlier to concentrate on the new fabric layers we were adding. Now we simply have to turn some of them back on. Here's a list of the layers I would suggest - but you're free to try others if you want.
- shade spine
- shade back side lower
- shade back side upper
- shade shoulder blade 2
- shade shoulder blade 1
- light mid back
- light shoulder blade
- abs
- waist
- side
- ribcage
- underarm
- abs side
- abs highlight
- breastB.upper breast
- breastB.breast shade 1
- breastB.breast lower
- breastB.breast upper
- breastB.chest light
- ab crease
Here we will use the Bump Map filter to add the appearance of shadows and highlights to the straps and trim. Its not really very difficult once you have the hang of it. There are two steps, broadly speaking. First create the 'bump mask'. And second use the Bump Map filter to apply that bump mask to the fabric. The application actually changes the fabric layer, so its a good idea to make a copy and make your changes there.
 Let's step through it, first making the bump mask...
- In the Layers window create a new transparent layer just above the layer you will want to change (trim for example) and make that new layer the active layer.
- In the tools window, make the active color White.
- In the Layers Window click the paths tab and choose the path you want to work on first. Make that path active, right click and choose Stroke Path.
- Set the number of pixels to 2 and press OK.
- On each layer with the 2 pixel white line we made above. Go to Filters->Gaussian Blur and choose something like 7 or 8 pixels. Press enter and watch it blur.
- Now make the fabric with your Trim or Strap fabric layer active and choose Go to Filters->Map->Bump Map
- Now in the dialog that opened, select the bump mask we have created for this layer. Use the pull down in the upper right to choose the bump mask. (it may be a good idea to give the layer a name you can find in the list)
- Also in the dialog - note the crossed arrows in the lower right of the preview panel. Pick it with your mouse and move your mouse cursor to make your active straps or trim layer visible.
- Now adjust the 'depth' (see the image below) to get the amount of shading you want. Also play with the other controls and see what they do. You may fine tune your shadowing with these.
- Press OK to apply your changes to the active straps or trim layer.

Repeat the above with each of the fabric layers (straps, trim) that you have and the appropriate bump mask layer for each. And you should end up with something that looks like the picture below.

Now with the straps and trim having some 'interest' too the top looks even better.
Add stippling to the fabric to give it a 3d look
This will be very similar to what we did above for the straps and trim. But we will create the bump mask for our fabric in a different way. We will create a simple seamless tile and use that as our bump mask, applying it to the fabric from a separate GIMP image in a tiled way. That sounds complicated but it isn't really.
Let's make the tile:
- On the GIMP Image window choose File->New and choose to create a 12 by 12 pixel image.
- Use zoom to increase the image size - roll the wheel on your mouse with control pressed.
- On the Layers window create a new layer and make it transparent. Delete the original layer that GIMP created for you.
- On the Tools window select the Paint Brush and choose one of the Fuzzy circular brushes.
- Hold the brush over the image and note how big the brush is in relationship to the image. You'll want a brush whose edges are about the same size as the Image.
- Keep trying different brushes until you find one of the right size.
- On the Tools window make the foreground color White, and centering your mouse pointer on the Image window tap the left mouse button once or twice. This will apply a nice fuzzy circle in this layer.
- Now make a duplicate of the layer you have created and make select it, making it active
- In the Image window choose Layer->Transform->Offset and click the button in the dialog that comes up that says "Offset by x/2, y/2" and click the Offset button.

We need to make this into one layer to make it a bump mask for the fabric, so go to Image->Merge Visible Layers and choose Merge.
Now we're ready to use this as a tile on our fabric. Make the original Image window active and go to the Layers window and make sure the fabric layer is selected. Then choose Filters->Map->Bump Map and in the bump mask selection pull down, find the layer we just created in the Bump Mask file. As before you might want to have given it a name to make it easier to find in the list. Then move the image preview window to and make adjustments to the values. I found that one that is good to change in this case is the Azimuth. The Azimuth is the angle at which the imagined 'light' is striking your bump mask to create highlights and shadows - move it around and find an angle that gives you a result that you like. You can see my results in the image below.

Add Wrinkles
We'll be using the Bump Map filter again to add wrinkles. I would bet that by this time you will have guessed the procedure, and you would be right. We're going to create a bump mask layer and then apply it to the fabric using the Bump Map filter.
*takes a deep breath* ...... However! ......*pauses*
Making the bump mask for wrinkles is pretty tricky. I'll tell you right now, be prepared to make about 10 or so before you finally have something you like. So you will want to plan accordingly and make copies of the layers you'll be applying your changes to - so you can back up as needed.
The problem is that the wrinkle is largely free-form and will require a steady hand. If you're on a laptop and have a mouse pad of some sort, you're in luck. That has been the best way of making wrinkles that I have been able to discover. My approach usually uses a combination of mouse pad and mouse. It can be done with just your mouse, or just a mouse pad, but it will be more difficult.
I'm going to just sketch out how to do it in words here and show you how it should look when you're done and then leave you to your own devices. If you decide this is just too much for now, I do understand. But.... Wrinkles really add a lot to the realism of the top, so if you can figure it out you will be very pleased with the results.
First - think of one wrinkle at a time, not wrinkles as a group. Each wrinkle, as we create it, will be in a separate layer. When we're happy with all the wrinkles we can combine them into one layer for use as a bump mask.
So here's how I create a wrinkle. We will create one between the breasts on our top as a starting point.
- Create a new transparent layer
- Set the foreground color to White in the Tools menu
- Choose the Paint Brush in the tools menu and select a fuzzy circular brush. (probably somewhere in the mid-rage of brush sized)
- In the lower portion of the Tools window click the box for Fade Out and note that its set to 100 pixels.
- Position your mouse in the center between the breasts, click the mouse and 'stroke' the mouse toward the right nipple (center of the breast) with a slight up curve as you move.
- You will notice that the fuzzy white line fades as you move the mouse - and it will probably be either too long or too short. Press ctl-z to undo. Change the number of pixels and try it again.
- Once you are happy with the shape of the wrinkle to the right, repeat the process (on the same layer) to the left. Starting in the center and moving with an up curve.
- Now you will probably want to edit your wrinkle and smooth it, perhaps make it a little narrower. To do so select the erasure tool on the Tools Window. Choose the larges fuzzy circular brush and then set the scale to something very large, like 6.
- now use the edges of your 'erasure' to nibble at the wrinkle you have made, smoothing it out, tapering it more and making it narrower as you wish.


Then apply your bump mask to the fabric with your bump map filter and you'll see something like this as an end result.
Whew! That was difficult! But fortunately the last is not.....
Adding Nipples
 This is really pretty simple and I would guess that by now you could figure it out yourself. I just tell you how to do it and show you the result.
 We'll create a transparent layer to hold our bump mask (appropriately named for this step *grins* ). Then we'll make sure our template is visible and make the fabric a little transparent. Select the paint brush and choose a fuzzy circle, you'll have to experiment to get the size you want. Then center the mouse pointer on the nipple portion of each breast and click. That's your bump mask.
By now you're an expert in using the bump map filter so go ahead and use your bump mask and apply it to the fabric. At the end you should see something like the image on the right.
OK! We're done! How do you like it?
robin
Tuesday, May 10, 2011
Making clothes - A tank top, part 2
Ok.... this is REALLY making a Tank Top! With that small lesson behind us it won't be too difficult at all.
We're going to divide this post into 4 steps:
The templates I like to use are from Chip Midnight. There's one for the head, one for the upper body and one for the lower body. You can download them here:
http://www.annotoole.com/CMFF/
Or....
You can use the Eloh Eliot's Starlight skin files we downloaded earlier. There is a copy of Chip's template in each of those files. Here's a link to my earlier post where we talked about tools and downloaded the skin files.
http://robin-makingstuff.blogspot.com/2011/02/tools-credits-and-caveats.html
For this top, I will recommend the second path. Using Eloh Eliot's Starlight skin files as a starting point. If you'd rather get Chip Midnight's templates, go ahead and use them. There's nothing we do in this post that can't be done with just the templates. But in the next post I plan to add lots and lots of detail to the top and we will find Eloh's files very useful when we do so.
So, make directory to work in and copy 'starlight_upper.xcf' into it. I would suggest you rename it right now to something like "robins blog top 110509.xcf". Then open it up, and go through the layers, turning off ALL of the layers that are turned on, and turn on the layer at the bottom of the layers list that is the template. {edit: I've learned since I wrote this that you can turn off all the layers but one by holding shift down as you click the 'eye' on the one to leave on.} Here's what it will look like when you're done:

Now comes the creative part. Also known as the tricky part!
 First. Create a new layer and fill it with the color of your choice. I've made mine a nice dark red. Make the layer you have just created a little transparent (about 70% or so the exact value is not important) so you can see the template though the layer you have just created.
Now use the path tool to create your path for the front portion of the template.
 We need to create our path that will create the 'cut' of our fabric. The front top portion of the cut will be very similar to our practice exercise. There will be 7 points, creating 6 line segments that will cross the template above the breasts. The thing that is critical is that we get the crossing points to be the same on the front and the back potions of the templates. To keep it simiple we're also making both the right and left crossing points the same. You can see what I've done in the pictures to the right.
Use the technique you leaned in the previous post to expose the handles and make the curves smooth across the upper chest above the breasts and likewise across the tummy below. Once you're finished with the front create a path for the back. Notice that we dont need as many points there and the curve is simpler.
 Here's a picture of the detail of the crossing point. I"ve resized the window and zoomed in to show you the detail - you'll need to do the same.
Its very important to get the crossing points to match. Notice that the is a color on the template to help on both the front and the back template, and that the lines are crossing one square up into the blue line segment. Also note the angle of the crossing. It can be difficult to get both the angle and the crossing point matching.... thank goodness for temporary texture uploads!!
 Here's a picture showing the detail of the crossing point on the back part of the template.
Ok - we're ready to make the cut. Go to the layers window and choose the path's tab. Depending on exactly how you created the path for the front and the back, you might see one or two paths. I have two in my example, so I will select one, right click, and choose 'Path to Selection', then select the next, right click and choose "Add to Selection".
Now click the layers tab and make sure the fabric layer you created earlier is selected. Mine is red. Then Select->Invert to make it select the portions outside the areas we've choosen to keep and press the delete key. You should end up with something like this:

Pretty nice isn't it!? Try turning off the template layer and you'll see that the rest of the image is transparent. Eventually that's the way we'll want it when we create the texture file that we will upload.
Adding trim, how to vanquish the Dreaded Jaggies!
Many 'freebie' items of clothing are just what we have done so far. And they suffer from the Dreaded Jaggies as a result. If you have a very fancy and powerful graphics card on your computer and have turned on such niceties as High or Ultra Graphics and Antialiasing - you will not see the Jaggies, but I promise you, they are there. And they will have been noticed by the mere mortals with less capable computers. ( Actually, that's a good thing to keep in mind as you make clothes - be sure to look at them in all the different graphics settings and lighting. You may be surprised with what you see. )
 The first step in correcting the Jaggies is to add some trim to our clothing. Fortunately, with our paths, its pretty easy to do.
 Now let's take a look at these Jaggies. You will want to click on the image to make it larger so you can see the stair-case easier. But they are certainly there!
What to do! What to do?
There is a way to create a similar effect to the anti-aliasing I mentioned earlier. The answer is to do a blur of the trim. So while the layer with the trim is selected, go to Filters->Blur->Gaussian Blur. How much is up to you, I think I usually do about 3 or 4 pixels for an image this size.
 When you're done, your trim will look like the image at the right. If you look closely you'll see that the staircase look is gone, and the edge of the trim is now a bit on the fuzzy side.
Actually, you'll still see the individual pixels but its a much finer grain now than it was. And when you wear the top, the Dreaded Jaggie look of the edge will no longer appear.
Creating the Straps
Since we're creating a Tank Top we'll need some straps. If you wanted a tube top, it would be ok to just stop here and leave the straps off. But we'll use the path in a slightly different way here so its a good thing to add the straps to learn about this.
For the main part of the fabric above, we created a "Selection" from the path that we created. Creating the selection 'completed' the path, making it into one closed area that became our selection. For the straps, we will just use the path, and will not perform the 'selection from path' step.
As before, this is the creative portion and your paths may look a little different from mine. If they do that's ok. And if the thought has crossed your mind that you'd really rather have a Halter Top, you can do that in place of the tank top I'll be doing. The critical part of this is to make sure that the points where the paths cross the edge of the template are the exact same on the front template and the back template.
My straps are not fancy, there are really just the three points for each strap, the two endpoints and one near the crossing to control the crossing line segment and let it be straight. One trick you will want to know about is to use the shift key when starting a new path. So create one of the paths for one of the straps, then press shift as you click the mouse to create a separate new path for the next strap.
Below you can see the paths for the straps. Look closely to see the third point in each path. It's near the top end point and will allow the top of the path to be a straight line as it crosses the template edge.

Finally, here's a picture entire top with the template still visible. Yours should look similar. There is one small change that I added. I tucked the straps behind the trim and then, with the strap layer selected, I went to the image and used the erasure tool to take out the tag-ends that are poking out of the bottom of the trim. Also remember that the straps on the back portion of the template need to be 10% narrower than those on the front portion.

You can save this (sans template layer) as a PNG file and upload it and try it out. But I would recomend waiting if you can. In the next blog post we will add a lot of detail to the top that will make it much more attractive. I have in mind several things:
robin
We're going to divide this post into 4 steps:
- Getting the Templates and using our newly found skills with the Path Tool to make our cuts.
- Add trim to the top and show how to get rid of the Dreaded Jaggies using Gaussian Blur.
- Add some more paths to create the straps and use Gaussian Blur with them too.
The templates I like to use are from Chip Midnight. There's one for the head, one for the upper body and one for the lower body. You can download them here:
http://www.annotoole.com/CMFF/
Or....
You can use the Eloh Eliot's Starlight skin files we downloaded earlier. There is a copy of Chip's template in each of those files. Here's a link to my earlier post where we talked about tools and downloaded the skin files.
http://robin-makingstuff.blogspot.com/2011/02/tools-credits-and-caveats.html
For this top, I will recommend the second path. Using Eloh Eliot's Starlight skin files as a starting point. If you'd rather get Chip Midnight's templates, go ahead and use them. There's nothing we do in this post that can't be done with just the templates. But in the next post I plan to add lots and lots of detail to the top and we will find Eloh's files very useful when we do so.
So, make directory to work in and copy 'starlight_upper.xcf' into it. I would suggest you rename it right now to something like "robins blog top 110509.xcf". Then open it up, and go through the layers, turning off ALL of the layers that are turned on, and turn on the layer at the bottom of the layers list that is the template. {edit: I've learned since I wrote this that you can turn off all the layers but one by holding shift down as you click the 'eye' on the one to leave on.} Here's what it will look like when you're done:

Now comes the creative part. Also known as the tricky part!
 First. Create a new layer and fill it with the color of your choice. I've made mine a nice dark red. Make the layer you have just created a little transparent (about 70% or so the exact value is not important) so you can see the template though the layer you have just created.
Now use the path tool to create your path for the front portion of the template.
 We need to create our path that will create the 'cut' of our fabric. The front top portion of the cut will be very similar to our practice exercise. There will be 7 points, creating 6 line segments that will cross the template above the breasts. The thing that is critical is that we get the crossing points to be the same on the front and the back potions of the templates. To keep it simiple we're also making both the right and left crossing points the same. You can see what I've done in the pictures to the right.
Use the technique you leaned in the previous post to expose the handles and make the curves smooth across the upper chest above the breasts and likewise across the tummy below. Once you're finished with the front create a path for the back. Notice that we dont need as many points there and the curve is simpler.

Its very important to get the crossing points to match. Notice that the is a color on the template to help on both the front and the back template, and that the lines are crossing one square up into the blue line segment. Also note the angle of the crossing. It can be difficult to get both the angle and the crossing point matching.... thank goodness for temporary texture uploads!!

Ok - we're ready to make the cut. Go to the layers window and choose the path's tab. Depending on exactly how you created the path for the front and the back, you might see one or two paths. I have two in my example, so I will select one, right click, and choose 'Path to Selection', then select the next, right click and choose "Add to Selection".
Now click the layers tab and make sure the fabric layer you created earlier is selected. Mine is red. Then Select->Invert to make it select the portions outside the areas we've choosen to keep and press the delete key. You should end up with something like this:

Pretty nice isn't it!? Try turning off the template layer and you'll see that the rest of the image is transparent. Eventually that's the way we'll want it when we create the texture file that we will upload.
Adding trim, how to vanquish the Dreaded Jaggies!
Many 'freebie' items of clothing are just what we have done so far. And they suffer from the Dreaded Jaggies as a result. If you have a very fancy and powerful graphics card on your computer and have turned on such niceties as High or Ultra Graphics and Antialiasing - you will not see the Jaggies, but I promise you, they are there. And they will have been noticed by the mere mortals with less capable computers. ( Actually, that's a good thing to keep in mind as you make clothes - be sure to look at them in all the different graphics settings and lighting. You may be surprised with what you see. )

- First click on the color swatch in the Tools window - it should still be red from before (or whatever color you chose) and move the cross-hairs to change the color a little. This will become the color or the trim so I made mine a little darker red.
- Now go to the Layers window, choose the Layers tab and press the button to create a new layer. When it asks, tell it that we want a transparent layer.
- Now, in the Layers window choose the Paths tab. Select the path that covers the front of the template, right click and choose 'Stroke Path'. On the dialog window that opens, set the number of pixels to 10 and press OK. (Stroke Line and Solid will have already been selected). The picture to the Right will show you what mine looks like when completed.
- Now do the same with the stroke path for the back portion of the template. Right click and choose "stroke path' and on the subsequent window set the number of pixels to 9 (not 10) and press OK.
IMPORTANT IMPORTANT IMPORTANT!!!
The width of the trim (and straps) on the back part of the template will need to be 10% narrower than the width of the strap on the front part of the template. Surprising isn't it? I could take you though the detail of why if you like, but it turns out that the back template size is about 10% SMALLER than the front template. This, by the way, it true for the lower template front and back as well.

What to do! What to do?
There is a way to create a similar effect to the anti-aliasing I mentioned earlier. The answer is to do a blur of the trim. So while the layer with the trim is selected, go to Filters->Blur->Gaussian Blur. How much is up to you, I think I usually do about 3 or 4 pixels for an image this size.

Actually, you'll still see the individual pixels but its a much finer grain now than it was. And when you wear the top, the Dreaded Jaggie look of the edge will no longer appear.
Creating the Straps
Since we're creating a Tank Top we'll need some straps. If you wanted a tube top, it would be ok to just stop here and leave the straps off. But we'll use the path in a slightly different way here so its a good thing to add the straps to learn about this.
For the main part of the fabric above, we created a "Selection" from the path that we created. Creating the selection 'completed' the path, making it into one closed area that became our selection. For the straps, we will just use the path, and will not perform the 'selection from path' step.
As before, this is the creative portion and your paths may look a little different from mine. If they do that's ok. And if the thought has crossed your mind that you'd really rather have a Halter Top, you can do that in place of the tank top I'll be doing. The critical part of this is to make sure that the points where the paths cross the edge of the template are the exact same on the front template and the back template.
My straps are not fancy, there are really just the three points for each strap, the two endpoints and one near the crossing to control the crossing line segment and let it be straight. One trick you will want to know about is to use the shift key when starting a new path. So create one of the paths for one of the straps, then press shift as you click the mouse to create a separate new path for the next strap.
Below you can see the paths for the straps. Look closely to see the third point in each path. It's near the top end point and will allow the top of the path to be a straight line as it crosses the template edge.

Finally, here's a picture entire top with the template still visible. Yours should look similar. There is one small change that I added. I tucked the straps behind the trim and then, with the strap layer selected, I went to the image and used the erasure tool to take out the tag-ends that are poking out of the bottom of the trim. Also remember that the straps on the back portion of the template need to be 10% narrower than those on the front portion.

You can save this (sans template layer) as a PNG file and upload it and try it out. But I would recomend waiting if you can. In the next blog post we will add a lot of detail to the top that will make it much more attractive. I have in mind several things:
- Give the straps and trim a more realistic 3d look.
- Give the fabric a more realistic look by:
- randomizing the color a little.
- adding a kind of stippling pattern of raised nubs
- add wrinkles that flow with the body
- and add a hint of nipples (robin blushes)
- And for the straps, trim and fabric. We will add the shadowing and highlighting that we have available to us in Eloh Eliot's Starlight skin file that we used at the start.
robin
Subscribe to:
Posts (Atom)